Automating Rails Deployments with Capistrano
Capistrano turns a manual deployment into a repeatable task. Setting it up on a Rails project, defining tasks and roles, and preparing a remote server to receive releases.
Capistrano is a deployment automation tool built on Ruby, Rake and SSH. A good deployment has five properties, and Capistrano gives you all of them:
- Predictable
- Repeatable
- Automatable
- Reversible
- Extensible
It was written in Ruby, so it is mostly used for Ruby deployments — but there is nothing stopping you from deploying other applications with it.
Prerequisites
- A local machine
- A web server
Setting up the project
Installing Ruby on Rails on Ubuntu:
# Add the rvm key to the server.
gpg --keyserver hkp://keys.gnupg.net --recv-keys 409B6B1796C275462A1703113804BB82D39DC0E3 \
7D2BAF1CF37B13E2069D6956105BD0E739499BDB

# Install the stable version of rvm.
curl -sSL https://get.rvm.io | bash -s stable --ruby

# Source it
source /usr/local/rvm/scripts/rvm

# Check the version
rvm version

# Set up the latest Ruby version
rvm get stable --autolibs=enable
usermod -a -G rvm root

# Available Ruby versions
rvm list known
Now create a sample project to deploy:
# This creates the files and boilerplate for us
rails new <ProjectName>

# Edit the Gemfile and add Capistrano
vim Gemfile # add gem 'capistrano'

# Install all the necessary gems
bundle

# In Capistrano 2.x this was `capify .`, but now:
cap install
That generates the default configuration and every file Capistrano needs.
Capistrano is all about tasks
Manual steps become tasks by editing config/deploy.rb:
# Open deploy.rb and configure the tasks Capistrano should run
git clone https://github.com/Imsurajkr/store.git
cd store
vim config/deploy.rb

# Set up a variable named recipient
set :recipient, "Ruby"

# Adding a description is always nice
desc "This is a hello world task"

# Create a task called hello
task :hello do
  # puts prints to the terminal
  puts "hello #{fetch(:recipient)}"

  # Roles are covered below
  on roles(:web) do
    execute 'whoami'
  end
end

# Another task
task :goodBye do
  puts "Goodbye #{fetch(:recipient)}"
end

# Tasks can be sequenced
after :hello, :goodBye
Roles
Roles let you write tasks that apply to multi-server deployments. The default app, web and db roles are used internally, so their presence is not optional. The :primary => true attribute adds further granularity when specifying services in custom tasks.
Capistrano is designed to run commands remotely, and its predefined roles are:
- web — the web server, e.g. nginx
- app — the application hosted on a server
- db — the database, e.g. PostgreSQL or MySQL
You can also read through the recipes Capistrano ships with.
Running commands on the remote server
Capistrano is popular for exactly this: setting up releases on a remote server. Let’s prepare one.
On the local machine
ssh root@1.2.3.4On the remote machine
sudo su # switch to root on the remote machine

adduser deploy
adduser deploy sudo
exit
Copy your key from the local machine
ssh-copy-id deploy@1.2.3.4 # replace 1.2.3.4 with your IP

# Copying the key means Capistrano will not be prompted for a password
Installing Ruby on the remote system
Capistrano needs Ruby present on the remote system:
# Add the Node.js repository
curl -sL https://deb.nodesource.com/setup_12.x | sudo -E bash -

# Add the Yarn repository
curl -sS https://dl.yarnpkg.com/debian/pubkey.gpg | sudo apt-key add -
echo "deb https://dl.yarnpkg.com/debian/ stable main" | sudo tee /etc/apt/sources.list.d/yarn.list
sudo add-apt-repository ppa:chris-lea/redis-server

# Refresh the package list with the new repositories
sudo apt-get update

# Install the dependencies for compiling Ruby, along with Node.js and Yarn
sudo apt-get install git-core curl zlib1g-dev build-essential libssl-dev libreadline-dev \
  libyaml-dev libsqlite3-dev sqlite3 libxml2-dev libxslt1-dev libcurl4-openssl-dev \
  software-properties-common libffi-dev dirmngr gnupg apt-transport-https ca-certificates \
  redis-server redis-tools nodejs yarn

# Set up rbenv
git clone https://github.com/rbenv/rbenv.git ~/.rbenv
echo 'export PATH="$HOME/.rbenv/bin:$PATH"' >> ~/.bashrc
echo 'eval "$(rbenv init -)"' >> ~/.bashrc
git clone https://github.com/rbenv/ruby-build.git ~/.rbenv/plugins/ruby-build
echo 'export PATH="$HOME/.rbenv/plugins/ruby-build/bin:$PATH"' >> ~/.bashrc
git clone https://github.com/rbenv/rbenv-vars.git ~/.rbenv/plugins/rbenv-vars
exec $SHELL

rbenv install 3.0.1
rbenv global 3.0.1
ruby -v
# ruby 3.0.1

# This installs the latest Bundler, currently 2.x
gem install bundler

# For older apps that need Bundler 1.x, install that too
gem install bundler -v 1.17.3

# Check the install — you should see a version number
bundle -v
# Bundler version 2.0
Pointing Capistrano at the server
The database and web server still need configuring, but first let’s test Capistrano. Tell it which machine to run against:
vim config/deploy/staging.rb

# Add this line so Capistrano knows your server
server "<YourIp>", user: "deploy", roles: %w{app db web}
Setting up deploy.rb
vim config/deploy.rb

# Add the following to point at the repository and branch
set :repo_url, "https://github.com/Imsurajkr/store.git"

set :branch, "Feature/something"

set :deploy_to, "/home/deploy/store"
Time to try it out:
# List the available tasks
cap -T

# Run the deployment
cap staging deploy --trace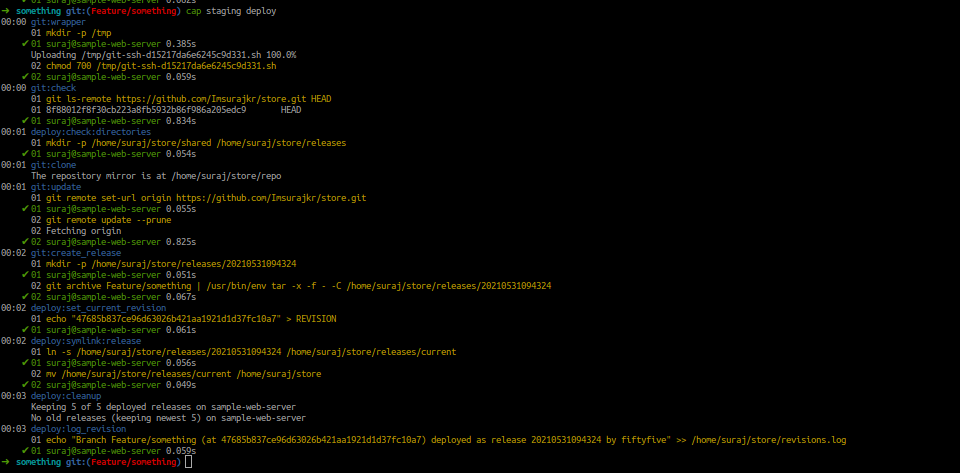
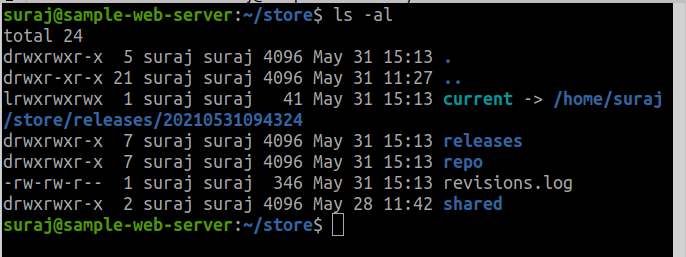
The directory structure
- current — points at one of the directories in
releases - releases — every deploy gets a timestamped directory here
- repo — a cached copy of your Git repository
- shared — anything shared between deploys
- revisions.log — the history of all your deployments